Thursday, December 19, 2024

THE GARDEN IS GONE

We know, you are probably thinking WHAT?!?

Another thing we decided to do, as we make way for a new house, is to make way for a new garden.


Here it is shortly after it was completed, about ten years ago.  It was gorgeous and we were proud of it.  I put a LOT of sweat equity into it.  I didn't build the fence but everything else was me.  I ran the water line, I built all the raised beds, I packed in a couple tons of soil, put down weed cloth and then spread an entire truckload of mulch, one wheelbarrow at a time. Not being out there full time, we made the best of it and learned how to remote garden (to a degree), doing it pretty well I might add:


  We got many wonderful veggies over the years that became great meals.  This was one of our favorite harvests, so much goodness in one week from a part time garden, ha.  I did a lot of experimenting to learn what worked and what didn't, what varieties grew best and what didn't, and of course we will move that knowledge forward into a new space.


But in the last couple of years, with the knowledge that we would be building new, and again, not being out there full time, we let the garden go.  We had been struggling with the decision: keep it and fix it up?

Then, in the hurricane earlier this Summer (or the derecho, can't remember which), two sections of fence fell.  I propped them back up, but we knew that the fence would have to be replaced completely, in addition a few raised beds needed to be replaced, and we'd probably have to redo the ground around the beds with more mulch and bring in more soil, etc.

We decided it was time to let it go...


Here it is one last time!


It didn't take them long to reduce it all to a pile of debris in the middle.


Then they hauled it all away and scraped it flat.  This was before the tree clearing guys did some more clearing to the left side of this photo.


Here is a view a couple of years ago from the back looking toward the barn and shed...


...and here is that same view now!

We're not even 100% sure that we'll put the new garden back in this space.  We kind of feel like we need to have the house up and us moved into it so we can see how we live in the space, how it flows, and where it would be best to put a new garden.  Closer to the house perhaps?  Maybe near the orchard area so watering is easy?  Maybe behind the barn and shed?  There is plenty of room there for something cool.

As for this empty spot, there is a possibility that this space could become something else...and we are leaning toward the idea of this being the right spot for the chicken coop and yard for them. Fenced, covered, some shade and some sun and a whole lot of space.  We have also toyed with the idea of having a covered pavilion (with a concrete slab) for entertaining or parking extra vehicles, work space etc.


Tuesday, December 17, 2024

THE KITCHEN NEW HOUSE TEASER

Caution: Long post ahead!

Well, we saved the best for last, at least in our opinion, ha.  We know it's the one you all have probably been wanting to see the most.

The original kitchen was smaller.  Almost the same layout but just not as long (i.e. fewer cabinets/drawers, less counter space, etc).  For us, having a big kitchen was a must have.  We opted for an alternate layout that lengthened it.  This also allowed for some big changes, including the bigger, longer island which you saw HERE last week.


Here it is!  18 feet long x 13 1/2 feet wide.

Let's start at the sink.

We made sure we had it out of the island and wanted it under a window.  It will be under this window looking out onto the front porch.


This is a photo from a model of our floorplan, and this is what our window will look like.  We'll have a great view, in fact, I mocked up this to show what we'll see:


Ha!  There will be porch railing in this view of course but hey, we'll be able to see the front yard, the driveway, the sky for the weather and most importantly, 2nd Man can watch while I'm mowing and have that glass of cold lemonade ready when I take breaks, LOL!

But wait, there's more!  We didn't want a sink like that one above.  Why not get...


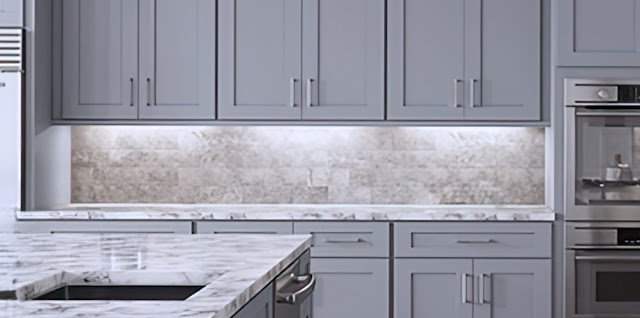
...a farmhouse sink!  One thing we were adamant about was no divided sink.  Divided sinks just make washing large pots and baking sheets and pans so much more difficult.  We had the choice of stainless-steel apron front or this ceramic white version. We opted for this one.  Side note, this photo shows gray cabinets like we'll have, so picture this being pretty close to our final design. We wanted a large faucet, and this one is very similar to what we will have.  Again, an upgrade to have a more flexible design in the faucet to make cleaning up easier.

Next to the sink will be a dishwasher, as is standard.

Here's where we also made a big change.  Remember in the pantry, we are putting floating shelves on the back wall?  We got that idea because we wanted it to match this:


We are taking out a section of cabinetry to have some floating shelves in the kitchen!  By the way, we won't have this tile all the way up behind ours, it will be a normal height backsplash.  Anyway, we are having two shelves just like this, they will match the gray cabinet color, and 2nd Man will display his favorite sets of mixing bowls.  They'll be pretty to display (nice little pops of color, little works of art) and easily accessible for use.  The shelves are mounted into studs for weighted items, so no worries there.


Here's what ours looks like on the drafting plans.  You are looking at this straight on (as if you were standing in the island) and so on the left side, those are the cabinets coming out in an "L-shape" from that wall.  We will have the floating shelves on one side of the window and then regular upper cabinets on the other side.  We opted to split the standard lower cabinet there in exchange for a narrow cabinet on the left side and then three drawers next to that.  Normal cabinets below the sink for "sink stuff", the dishwasher next to that and then we are leaving the lower cabinets on the far, right side.  However, we are doing this inside of those cabinets:


When you open the cabinet doors, there will be three slide-out (adjustable) shelves.  It will be much easier to access things inside that we need and not have everything get push to the far back.


Electrical is as we usually do, lots of outlets, ha.  And they will be mounted under the cabinets, so we don't have plugs in the wall.


Oh, and also undercabinet lighting installed throughout the kitchen.  Lots of lighting in the ceiling throughout the kitchen.


Like the sink photo, here is a photo from the same model version of our home (it was still under construction when we took these pictures).  This is almost identical to what we will have (different colors of course) but there are going to be some changes.  As you can see, it's a lot of nice counter space on either side of the cooktop.  2nd Man wanted good landing space on each side of the stove instead of being stuck up against a cabinet on one or both sides.

Oh, speaking of the cooktop, that was the first change we made.  With no gas at the farm (and we didn't want to have to deal with propane), we needed electric.  We removed the regular range and oven that would be in that spot and chose a cooktop.  This photo has a regular 30" electric cooktop.  We opted for a 36" induction cooktop.  More on that in a future post on appliances.

Notice the oven with microwave above it in this picture?  Remember last week in the post about the island we said we moved the microwave into it?  With no microwave above the oven, what else would go there?

Well, instead of one oven...


...2nd Man is getting double ovens!  Two times the fun!  Two times the baking!  Two times the roasting!  Two times the amazing food!

But wait, that's not all!

Our vent hood will not look like the one in the model home photo, instead, we are going for this:


We wanted the exposed vent hood because we like the look of that.  It'll be 36" wide to match the cooktop with bright lighting and will move a lot of air.

But wait, there's still more!

Before we ever even picked a house, we always said if we ever built or remodeled, we would have this:


A pot filler!  It was an extra expense (kind of like opting for a rain shower head in the master bath shower), but for us, it will be worth it.  Especially since the sink is a bit away from the stove to carry a heavy pot of water, especially as we get older.


Like the sink wall, here is the cooktop wall of our actual architectural plans.  You can see the cooktop, vent hood, pot filler and double ovens we talked about above.  But like the other wall, we made some more changes to the cabinetry.  We kept the uppers as normal cabinetry.

With the cooktop, there is the fixed space directly below it (to accommodate the inner workings).  Below that (as you saw in the model photo) normally there would be cabinets.  In fact, all along that wall would be cabinets.  We deviated from the norm.  We've seen many shows and photos where the more practical way of a new doing a new kitchen is to have deep drawers in lieu of cabinets.


Not all shallow drawers but deep ones to hold pots and pans.  No more digging around looking for something in the back of a cabinet.  Slide the drawer out and there is everything you use.  Grab what you need and go!

As you can see, there are six of those deep drawers and two shallow drawers.  One of the shallow drawers will hold 2nd Man's knives and cutting implements.  You may ask, where do you put things like spatulas and tongs and other things? The counter like we have now?  The other drawer?

See those two narrow cabinets on either side of the drawers under the cooktop?

They will be pull out cabinets like this:


One side will have built-in containers for holding cooking utensils and the other side will be a slide out rack for oils, bottles, etc.  Seemed like the perfect spot for something like this.  2nd Man is so excited.

Plus remember, when we turn around from the cooktop, the island behind us will have more drawers! 


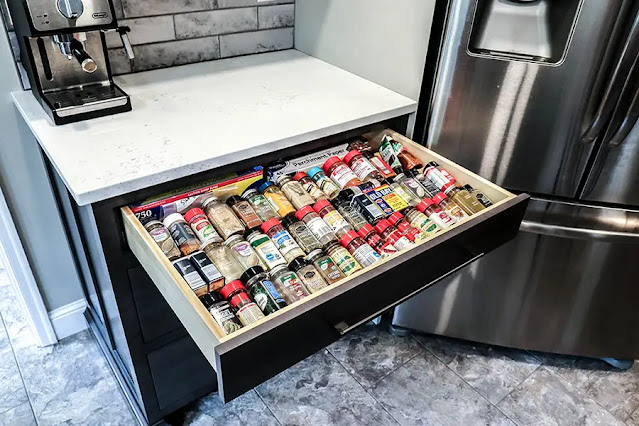
2nd Man is thinking one of the shallow drawers will need to look like the above, spices and seasonings!

On the architectural drawing, you can see the space for the refrigerator and a couple more cabinets above that.  Speaking of more cabinets, did you notice something in the photos and drawings?

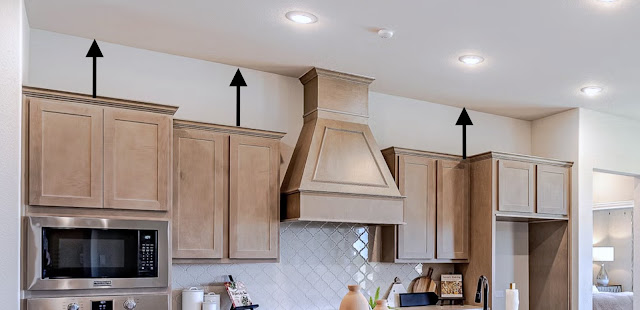
Normally, the upper cabinets stop and there is space above, like this:


We had this at our last house, and it was just a greasy dust bunny collector.  It was also a waste of space.   Sure you could put fake plants up there or bowls or knickknacks but then they get greasy and dusty, ha.  You know that we are big about maximizing storage and that is space we could reclaim with cabinets.


So, we asked them to go all the way to the ceiling and that is what we are getting.  We might need a ladder, but oh well.  The builder had a great suggestion, use the uppers for the rarely used, once a year stuff.  Like make one the birthday cabinet and keep birthday supplies up there, another one could hold the Christmas and Thanksgiving plates, etc.  Smart!

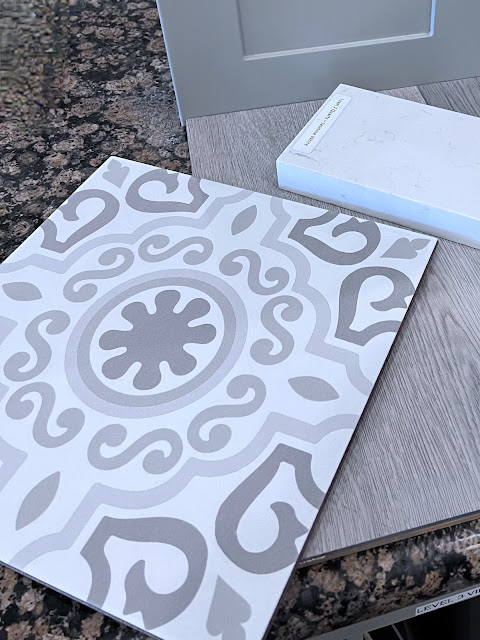
And lastly, the decorating choices.  We have the gray cabinets as we have mentioned.  For the counters here though, we are going with white, like we showed on the island.  It's a Carrera marble look but quartz.  For the backsplash, we are going different.


We chose this ceramic tile for the backsplash.  It should add some visual interest and give a different kind of look than just subway tile as is so common now (which we love but we just wanted to do something a bit different for us).

And speaking of something different, the last big thing we did was this:


We are taking this area (outlined in this photo) above the cooktop and between the cabinets, to go with something that we hope looks pretty awesome...


...this tile will fill that spot from counter to ceiling.  We hope it adds a really nice focal point behind the stove, it almost looks like a patchwork quilt when all put together into a pattern (we laid some side by side to see what it looked like).  Somehow, it seemed appropriate for the farmhouse.

So that's it...the kitchen of our dreams!  We got everything we ever wanted in a kitchen and prep space and food storage space.  We planned ahead and got it all.  The builder rep said most people spend all the upgrades on bathrooms and media rooms and stuff like that, we spent ours where it matters most to us.  Wonderful meals and prepping to be fully stocked.

We cannot wait for the cooking and entertaining to begin!


Monday, December 16, 2024

TEMPORARY POWER POLE

Septic has been designed.
Foundation has been designed.
Final plans have been sent to drafting.
Now they have done this...


They installed the temporary power pole!  After this picture was taken, the power company came out and installed the meter.

Construction is starting soon!

Sunday, December 15, 2024

GOOD FOOD AND HOBART SUNDAY

 Yesterday was rainy and yucky (but some good and fun errands) and today is sunny and clear.  Go figure.  Time for some good food and some Hobart!

Grilled fish over one of my salads with some homemade pickled onions and a vinaigrette.  It was so good.  It's always fun to have your salad and your main dish all at the same time, ha.  We have eaten more fish over the last year than ever in our lives.

And that's a good thing!


Hobart was sleeping on the couch next to me and I had the remote next to me.  I was petting him and he stretched his front legs and pulled them back to cover his face as cats often do.  Instead, he grabbed the remote and pulled it toward him.  I told 2nd Man we had to get a picture!  It only lasted about ten minutes but it's ok we let him hold it.  Because...

#notspoiled

Saturday, December 14, 2024

ANOTHER WEEKEND TO RUN ERRANDS


Again, a rainy week and so we don't have to water and with nothing going on at the farm yet (with regard to the new build) it's another weekend to window-shop.  

Today we do have to stop by the builder to go over a few things but before (after?) that, we're going to go to a few furniture stores to just do some window shopping for what we might need at the new house.

The only real furniture we will need is a new sectional/couch arrangement for the living room.  We're not taking our current ones with us.  But we have plenty of furniture for the rest of the house.  Of course, you never know what we might find that gives us an idea to change out something later!

Oh and we'll stop at the grocery store and get something for some fabulous cooking later/tomorrow.

Hope you all are having a great weekend!

Thursday, December 12, 2024

LAND CLEARING PART 2

There was more land clearing.  The builder wanted us to clear this area that was close to the house.  You saw some of it in part one last time click HERE to see that.

Here are some more parts.


This area is where the new well will be drilled.  It needed to be clear for the trucks and plus we just need to have the area neater.  The red arrow is a frame of reference to be able to see how much was done in the after in this next picture...


...as you can see, it's COMPLETELY cleared.  That stake in the foreground with the blue flag is where the well will be drilled.


This area is from one side before...


...and this is the same area from the other side looking back toward to where the other picture was taken.  Quite a difference!


Another before...


...and after.


Thought you all might like this picture.  It's standing in our newly cleared area looking back toward where the new house site will be...look at all the space!!?  We have a new "yard" beside the house, with still more clearing to be done behind me when taking this photo.

Hmm, more grass to mow?  More area to do some fun stuff in for sure!

Tuesday, December 10, 2024

KITCHEN ISLAND NEW HOUSE TEASER

 Yes, our island needs a post all its own, ha.

The original floorplan had an island but it was smaller:

Here is a picture of one just like it, as it would have come in our floorplan.  Seating (for three?) along one side and just cabinets and drawers on the other.  In some cases, a sink was in the middle as well.  Sure, it's an island but none of that would work for what we had in mind.

We have this island at the apartment (sorry for dark picture this was before we moved in and all the lights weren't on, ha).  It looks like it would be a good space, but it's got the sink in the middle, the dishwasher on one side of the sink (so that's the landing spot for dishes out of the dishwasher) and a very small cabinet on the other side of the sink.  The front is curved for seating, which we've never used.  It's good for a few things but mostly, it's not very practical.  We started rethinking our own island, I mean if you are going to design one, why not get what you want?

First rule for both of us, no sink in the island.  We made sure it was along the wall (more on that in the kitchen post). That will give us the entire top as usable space.  Since we made the kitchen longer, it also gave us the chance for a longer island, so we extended it.


10' long x 5' wide!

We'll call one long side of it the "kitchen side" and the other will be the "family room side".

But wait, there's more, ha.  Nine feet is the length when it gets enlarged just for the bigger kitchen and then we thought, since we don't want seating on the long "family room side", why not give us some seating for just the two of us?  We added 12" at the end, to make it 10' instead of 9'.  An overhang of the countertop, to give us something like this:

Seating for two at the end of the island!  Ours will be on the dining room end (the other end will be directly behind the sink).  I can sit there and blog or help with recipe development while 2nd Man is cooking (and I can take lots of pictures, ha).

Here's another picture of what we'll be able to do...we can sit there and have an evening meal or a cup of coffee in the morning.  Heck, if we have company over, it's a space for two more people to sit.  We thought this was a good use of space and gives 2nd Man an extra foot of counter space length.  Hey, I can sit there and snap beans from the garden someday, ha!


On the kitchen side, as above, we wanted drawers instead of cabinets since you can turn around from the cooktop and access it.  There will be three in the middle. Because the island is longer, at each end, there will also be space for two cabinets that we will use for cutting boards (at the end closest to the sink) and baking sheets (at the other end closest to oven area).

As you probably already saw in the plan, we wanted a couple of appliances in the island, on the kitchen side only.  The kitchen plan came with a microwave over the oven, and we debated if we even wanted a microwave.  We didn't have one for years at the house and got along fine, but the apartment came with one and we've come to use it for those things that only a microwave can do best (reheating, melting butter, etc, ha).

So, we decided to move the microwave into the island, at one end closer to the cooking area!  There will be another deep drawer under the microwave, and we'll use that to keep our microwave containers and accessories.  It'll look much like the above, with an extra cabinet at the end of course.

The other extra appliance that we wanted was a wine fridge.  We're not big wine aficionados, but it would be nice to have a place for them and keep a couple dozen bottles on hand.  We are putting this at the other end of the kitchen side so it will be near the dining room for convenience.  It'll look kind of like the above pic, again, with another small cabinet on the side.


Since we didn't opt for seating along the living room side, we decided to maximize both spaces and wow people with appearance, ha.  For this side, we are having glass cabinets put all along the front, as in the drawing above.  Four glass double doors and then a smaller glass door on each end.

We will have them lit from inside and use them to display a lot of our Le Creuset collection.  Something like the picture above.  It will look really nice when you walk into the living room and look toward the kitchen and see it lit up and all the colors of the cast iron.  Plus, bonus points for MORE STORAGE.  Oh, and no glass shelves like this picture, ha, the weight of the cast iron will require solid shelves.


Here's something we had no idea about.  2nd Man wanted a few outlets along the side of the island, as you might imagine.  Well, the US electrical code changed a year or so ago and now, no one can put electrical outlets in the side of an island below the countertop!  It's a safety feature so kids don't grab a cord and pull something off the island.  2nd Man was NOT happy, but it's code, not much we can do about that, sigh.

So that begs the question, how does one plug in electrical appliances (crock pot, pressure cooker, mixer, etc) on an island without outlets on the side?  I mean that's what they are for, extra counter space to do stuff on and put those things you are using to prep a meal.

Solution: pop up outlets!

We will have only one pop up, down at the end near where our overhang is.  2nd Man didn't want it in the middle because of course that would interrupt with dough rolling.  It does disappear flat into the countertop. When you need it, it pops up like this:


This is kind of an old picture, they are flush now, but just to get the idea of how they work.  You pop them up and plug in the appliances that you need to use (four outlets, two on each side) and then push it back down into the counter when not needed.

One bonus thing (and it's kind of cool) is that you can lay your phone or tablet on it, and it will wirelessly charge.  That's convenient.  But it's still a pain not having outlets along the side, ha.


As you know in the bathrooms (and butler's pantry), we chose a black that looks like soapstone or honed granite.  For the kitchen, including the island, we chose a Quartz in Jasmine White.  It mimics the look of Carrera Marble without the exorbitant cost, ha.


We will still have our gray cabinets.

In the end, it should look about like this:


As 2nd Man likes to say, at ten feet long and five feet wide, it will be "fifty square feet of glorious, uninterrupted counter space".  He is beyond excited.  The dough that will get rolled out on there...ha.