Showing posts with label Recipe. Show all posts

Thursday, June 20, 2024

CHICKEN VEGETABLE SOUP FOR THE HEART AND SOUL

2nd Man loves to make a hearty chicken soup loaded with vegetables.  With us eating healthy, he is making more and more soups like this where we can control the ingredients we use (or not use, ha).


He usually tells me to just pick up whatever vegetables you want to have in it.  Onions, corn, green beans, mushrooms, greens...


Butternut squash, celery, carrots...


Yellow squash, zucchini, garlic and little potatoes.


2nd Man roasted some chicken, no salt, just pepper and some seasonings, spritz of olive oil spray on each one.  After the roasting is done, he removes the skin and throws it away.  We did some research and found leaving the skin on adds flavor not fat, as long as you remove it before eating.  


No sodium homemade chicken broth and water, cooking all the veggies until done...


To serve, we put chunks of chicken in the bottom...


...and then ladle in the broth and vegetables.

So good and so filling and so satisfying.  Definitely healthy for the heart AND the soul.

Thursday, March 28, 2024

WHITE VELVET CAKE RECIPE

Thank you all for the sweet birthday comments from yesterday.  It was a good day, coworkers treated me well and so did 2nd Man, ha!

Recently, 2nd Man made his own birthday cake.  Now, before you feel bad, he asked me not to buy one or make one, he wanted to try something new.  Several of you asked for the recipe & that's why we did this post.

The recipe is from King Arthur Flour.

CLICK HERE

It's called a "White Velvet" cake and yes, it's a 'cousin' of Red Velvet cake. Same texture and method, only no cocoa and of course, no bottle of red food coloring, ha.

Ingredients:

  • 3 cups (360g) all purpose flour
  • 1/4 cup (28g) cornstarch
  • 1 3/4 cups (347g) granulated sugar
  • 1 teaspoon table salt
  • 2 teaspoons baking powder
  • 3/4 teaspoon baking soda
  • 1/2 tsp lemon juice powder (or 1TBSP lemon juice)
  • 12 tablespoons (170g) unsalted butter, at room temperature; cut into 1” pieces
  • 5 large egg whites (175g), at room temperature
  • 1 1/4 cups (284g) buttermilk, at room temperature
  • 1/2 cup (99g) vegetable oil
  • 1 tablespoon (14g) pure vanilla extract
  • 1 teaspoon almond extract
  • 1 teaspoon white vinegar

The steps are a bit more involved to post here, so again, click the link at the top to get all the details on how to mix everything together. 

The batter, once divided, will fill two 8" round cake pans and then you bake them for 35 to 40 minutes.

__________________________

Now, he made his own frosting using mascarpone cheese and then he created a vanilla pastry cream filling for the layer in between.  You could use a traditional cream cheese frosting or if you like buttercream or whipped etc, use whatever you like.  The filling in between layers you could use (as is normal) whatever frosting you have for the outside, but 2nd Man wanted it to be different and more vanilla forward in taste, hence the pastry cream.

It was delicious!

But we only had one slice each because, it's all about moderation now...and my office reaped the reward of the leftover cake (to rave reviews!).


Wednesday, February 21, 2024

QUICK PICKLED RED ONIONS

When I made ribs Sunday, we needed some pickled red onions.  We had already used up the ones I made last year.  You can see that post HERE.

But the ribs were the next day and I needed less salt and something that I didn't have to cook the brine first.

So, I tweaked the earlier recipe a bit and these came out great!  We really like them.  There is no heating of the liquid so it's quick and easy and it uses minimal salt (still need some) which works for our healthier eating.

PICKLED RED ONIONS

1 cup water

1/2 cup apple cider or white vinegar

2 TBSP sugar

1/2 tsp salt

1 red onion, thinly sliced

Slice the onion as thinly as possible.  I like to slice them vertically because it gives you the strips instead of the rings, but hey, you do what you like!  The thinner the slices, the more the vinegar mixture will permeate to soften and mellow the onions.

Put them into a jar, one medium to large red onion should make enough for one pint jar and the liquid will be enough to fill it up.

Mix all the ingredients together and whisk until sugar and salt is dissolved, no cooking necessary.

Pour it over the onions, put a tight fitting lid on and give it a gentle shake.  You can leave them to sit for an hour and eat right away but if you do them overnight, they'll get super good.  You can actually keep these for up to two weeks if you keep them in the fridge, though they don't last that long here!

You can also do like our last cooked brined batch and add jalapeƱos, red pepper flakes, peppercorns, etc.

They were very good even after just 24 hours of being in the fridge, we'll finish them off over the next few days.  They are great with BBQ, adding a tang and crunch.  Some people use sliced pickles for this and that's great as well, but Texas BBQ likes the red onions.  They are also great on sandwiches, tacos and are a frequent condiment with TexMex food.  Heck, last night we had a salad and put the onions in there!

Enjoy!


Wednesday, October 25, 2023

BANANA BREAD RECIPE

Guess what I did?  1st Man baked!

You might remember HERE where we got some bananas from a coworker and we put them up in freezer bags.  Recently, I began researching banana bread recipes and found several.  I combined them until we found one that we really loved.


INGREDIENTS:

1 1/2 cups all purpose flour
1/4 tsp salt
1 tsp ground cinnamon
1 tsp baking soda
3 or 4 super ripe bananas, about 1 1/2 cups mashed
8 TBSP (1 stick) of unsalted butter, melted and cooled
3/4 cup packed light brown sugar
2 large eggs beaten
1 tsp vanilla extract


Preheat oven to 350 degrees.
Grease and flour an 8 1/2 x 4 1/2 loaf pan.

Mix wet ingredients - to the mashed bananas add the beaten eggs, butter, vanilla, and brown sugar.

Whisk dry ingredients - flour, baking soda, salt and cinnamon.

Add the dry into the wet, a little at a time, stirring to incorporate until flour disappears.


Pour batter into pan and pop into the preheated oven.  Bake 55 to 70 minutes, depending on your oven, until knife in the center comes out clean.  Our one was 60 minutes on the nose.  Check it after about 40 minutes just to make sure it's not browning too much.  If it is, you can put foil over the top.


Remove from oven and let cool on a wire rack for 10 minutes.  Then turn it out and let it cool.

Slice and ENJOY!  So good.  It's even better a day or two later.  Can keep at room temp for a day or in the refrigerator for up to a week. 

If it lasts that long.

My next plan is to try walnuts and/or chocolate chips.

Thursday, September 7, 2023

LEMON BUTTER PASTA WITH PARSLEY

 A few years ago, 2nd Man was looking around in the pantry and fridge for dinner.

Pasta.

Some fresh lemons.

Parsley.

Butter.

That all sounds like a meal...

He zests one lemon, minces up some parsley, squeezes lemon juice from half and cubes up some butter.  It's really all to taste. 

Boil the pasta (any shape) and drain it (saving 1/4 cup of the pasta water).

While it is still hot, just toss in the butter, lemon juice and zest and a bit of the pasta water the thickness you desire and stir until melted.  Finally, toss in the fresh minced parsley and stir again.

We like this on a night when we want something that's not heavy, like a cream sauce or rich tomato sauce.  It's almost refreshing in a way.  Sometimes, he'll put in some minced garlic sautĆ©ed with some chicken or, our favorite addition, shrimp.

We're sure there is some Italian dish for this same thing with a fancy name but we call it lemon butter pasta and we love it.  It's now one of of my favorite dishes.

Wednesday, August 23, 2023

CHICKEN COBBLER RECIPE

We always like to try something new and recently, we saw this one that went viral on the internet.  It is called "Chicken Cobbler", two things you normally think of separately, chicken for dinner and cobbler for dessert.

The recipe is attributed to Matthew Bounds, a home cook whose video has been watched more than 30 million times.  He goes by @yourbarefootneighbor (side note, he is is hilarious while cooking).  

Chicken cobbler ingredients

INGREDIENTS:

1 rotisserie chicken, shredded
1 16 oz bag of frozen peas and carrots
Salt, pepper and garlic powder
1 stick of salted butter
2 cups Red Lobster Cheddar Bay biscuit mix
2 cups milk
2 cups chicken stock
1 can cream of chicken soup

13x9 casserole dish
Preheat oven to 350 degrees

Melted butter
Melt the stick of butter in the microwave, or do like we do, just put it in the dish while the oven is preheating and when you are ready for the next step, it's melted.

Shredded rotisserie chicken
Once it is melted, put the shredded chicken in an even layer over the butter...

Don't stir

Frozen veggies, peas and carrots
On top of the chicken, spread the frozen veggies in another layer and sprinkle with salt, pepper, garlic powder to taste...

Don't stir

Cheddar Bay biscuit mix and milk
Mix the entire bag of Cheddar Bay biscuit mix (including the little packet of seasoning that comes with it) with two cups of milk...

Cheddar Bay biscuit mix over top
Pour the Cheddar Bay and milk mixture over the top of the vegetable in another layer.

Don't stir

Chicken broth and cream of chicken soup
Mix 2 cups of chicken broth with the can of cream of chicken soup...

Chicken cobbler ready to bake
Pour this over all as the last layer.

Don't stir

Are you sensing a theme here?  LOL, this isn't a mix it all up casserole, it's more letting the layers do their thing as it bakes. It forms a gravy layer and a biscuit type cobbler top.

Baked chicken cobbler
Bake, uncovered, at 350 degrees for 45 minutes to 1 hour.  It will be a bit jiggly in the center but you will let it sit outside of the oven for about 15 minutes to cool down and the gravy it creates thickens up.

Chicken cobbler
Dish it up and enjoy.  Oh my, we have to say, this is a delicious recipe.  It really is like a savory cobbler.  The second day, it's really firmed up and holds its shape, like lasagna the next day.  We like it both ways, ha. 

They say this is a flexible recipe, different veggies, different cream of soup, etc.  The Cheddar Bay biscuit mix is wonderful though, it has a great flavor and works perfectly to make the cobbler-like top.

Sometimes recipes are viral for a reason, they're good!

Thursday, August 10, 2023

PUFF PASTRY PEACH DESSERT

A few weeks back, we posted about our peach harvest and our ongoing (at the time) blueberry harvest.  We used them both in different ways but here is something we tried that was so good.

It's sort of the latest viral cooking trend, TikTok, YouTube, etc.  Literally only three ingredients (four if you count BOTH fruits).  It's using puff pastry to make an upside down savory or sweet treat.

Ingredients:

One sheet of puff pastry, thawed, cut into rectangles
Drizzles of honey
A few sliced peaches (and we added blueberries)


Line your baking sheet or you'll have a sticky mess for sure, ha.  Pour some honey in the spots where you will put the fruit.


Lay the sliced peaches on top of the honey, in about the size of the squares of puff pastry.  I also sprinkled some blueberries on top but forgot to get a picture of that.


 The size I cut them to worked great for six pastries.  Cover the fruit with the square and I used a fork to press down the edges.  Not the prettiest job on a couple but hey, we just say it's "rustic".


Brush the tops with an egg wash (one egg yolk with a little cream).  You could even sprinkle sugar but keep in mind, you're looking at what will be the bottom.


Pop in the oven at 350 degrees and bake for 20 minutes or until the puff pastry is golden and puffed up.  The box of puff pastry will give suggested time and temperature as well.


I sprinkled some powdered sugar on top.  These deflated a bit while I was getting them ready for the picture.  They are best right out of the oven when hot and fluffy.  On the viral videos, they also make these savory, with onions and cheese for example, under the puff pastry.  You can also use just about any fruit.  Honey is optional.  There are even ones with apples and  maple syrup.  Yum!

Definitely a good way to use up the fresh fruit from our trees and bushes!


Monday, July 17, 2023

NO SUGAR COLESLAW RECIPE

Several of you have asked for this recipe over the years and so when I made it this most recent time, I took pics and here it is! 

We found this recipe online a few years back (don't remember where) but we've modified it over the years to make it how we like it so I guess that makes it more like our own recipe.

Now please note, there is zero sugar in this coleslaw.  This ain't your Grandma's coleslaw, ha!

It's contrary to normal slaw.  2nd Man has never really liked sweet coleslaw (or potato salad that's sweet for that matter).  I do like them, but when I started making this, I was a convert.  Of course you could always add a bit of sugar (to your taste) and just turn it into a more traditional style, if you desire.

We make it with "broccoli slaw" which we get at our HEB grocery store but you can use a regular slaw mix.  We like the prepackaged mixes because they are much easier to prepare (feel free to shred your own).

Ingredients:

14 oz bag coleslaw mix (the mix we use comes in a 9 oz bag so we use two bags but it still works fine)

1 cup mayonnaise

1 TBSP yellow mustard

2 TBSP heavy cream (we only had half and half this time, it works just fine)

Seasonings:

1 tsp garlic powder

1 tsp salt

1 tsp pepper 

1 tsp dried chives

2 tsp celery seed


Once you have your ingredients, mix them all together.  It might seem a bit dry as you mix but remember, the salt will start to pull out additional moisture and it should be just right.

However, if it needs to be adjusted later, you can always add a little more cream or mayo or even a little more mustard.
Make it as you like it.


I always try to make this the night before, because it's even better the next day after all the flavors have melded together and it gets nice and creamy. If you get the prepared bags of mix, it literally comes together in less than 10 minutes, so it's super easy to do ahead.

If you can't do it overnight, at least do it a few hours before dinner so the slaw veggies have a chance to soften up a bit and the flavors to developed.


Lastly, just dish it up and serve!

Even though I enjoy a sweet coleslaw, when we have something like BBQ, which is inherently sweet with BBQ sauce, it's a really nice compliment to the meal.  Bonus points for also being "low carb", "lower calorie", "no sugar", "keto friendly" and all those things, ha.

Enjoy!

Monday, June 26, 2023

KATHERINE HEPBURN'S BROWNIE RECIPE

This has been an internet classic for years.  The recipe was given to a columnist by Katherine Hepburn who said it was her favorite brownie recipe.  It's ours too!
 
Ingredients:

1/2 cup cocoa powder
1 stick (1/2 cup) unsalted butter
2 eggs
1 cup sugar
1/4 cup flour
1 cup roughly chopped pecans or walnuts - optional
1 tsp vanilla
pinch of salt

Heat your oven to 325 degrees.  Melt the butter in the microwave (or saucepan) and stir in the cocoa powder.  Allow it to cool a bit and pour into a bigger bowl.  Whisk in the eggs one at a time and stir in vanilla.

In another bowl, combine sugar, flour, nuts (if using) and salt.  Add to the butter-cocoa mixture and stir just until combined.  

Pour into a greased 8x8 square pan.  Bake 30 to 35 minutes or until a toothpick inserted in the center comes out clean.  Do not overbake.  The brownies should be gooey.  Let cool and then cut into bars.


Now we did this batch a bit differently, note that the recipe as above is for an 8x8 pan.  2nd Man wanted to try a thinner brownie so he used our Lodge cast iron pan and since it's bigger, he doubled the recipe.


He baked it and they came out great.  After cooling, he used the parchment to lift them out and then sliced them into squares.


We always love the flavor and texture of this recipe and they were really good being baked a bit thinner.  Next time we'll do them back in the 8x8 pan.  We just wanted to have a bit more to last through the week of snacking and eating, ha.

Changes:

Some of the things we do differently:

We swap out different nuts from time to time (and sometimes don't even use them)...

We use salted butter instead of unsalted because it gives such a great taste to the chocolate...

We use use a special dark chocolate cocoa powder (made by Droste) that's why this batch is dark...


Enjoy!

Monday, June 12, 2023

HOW TO MAKE AUTHENTIC PORK CARNITAS

Pork carnitas.  A Mexican classic that is so good and yes, you can make them yourself.  Traditional carnitas are made this way, fried in a kettle in lard.  There are others made in the oven and basted over and over (we've done that and they are good) and some are cooked in a crock pot and other are pan friend in oil.  We've done them that way too but this is the most authentic way (short of outside in copper over a fire!).

Pork carnitas
There are not many ingredients, but again you will be frying these in lard.  You can use other oils but because you are adding liquids and odd ingredients, you could burn yourself or cause a big mess in your kitchen if you try this with regular oil (look online for those versions if you'd rather try it that way, they are out there).

Lard doesn't react to having coke and orange juice being poured in as other oil might.  It is sold in stores right next to the other oils.  We get the Morrell Snow Cap brand and before you think lard means greasy, if you do these right, not greasy at all.

But again, if you'd rather not use lard, just look for some recipes that use oil.

Carnitas ingredients
Believe it or not, these are all the ingredients.

 5 lb pork shoulder butt
3 medium oranges cut in half and 1/2 cup of the juice
3 bay leaves
6 garlic cloves
1 8oz bottle/can Coca Cola
1 can evaporated milk
3 or 4 lbs of lard

Ours was bone in and about 8 lbs total, but the bone is part of that.  We probably ended up with about 5 lbs of meat after deboning. 
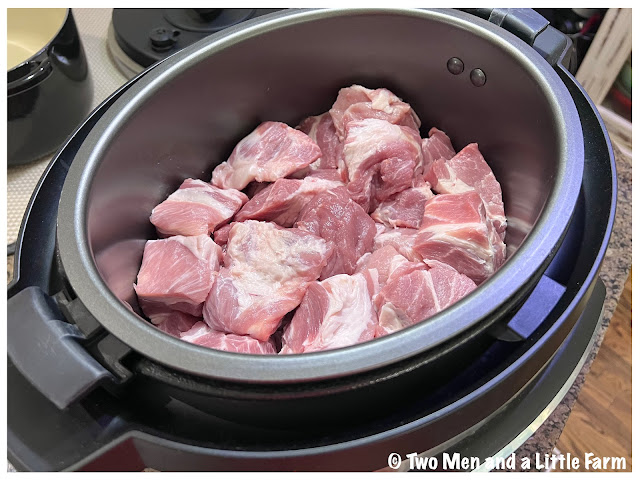
Pork in pressure cooker
 Now this is a step we do to make the cooking time a bit shorter and make them fall apart tender.  We take the meat off the bone (unless you have boneless) and cut into about 3 inch size chunks.  Add 1/2 cup water and salt to taste and pressure cook on high for 30 minutes.
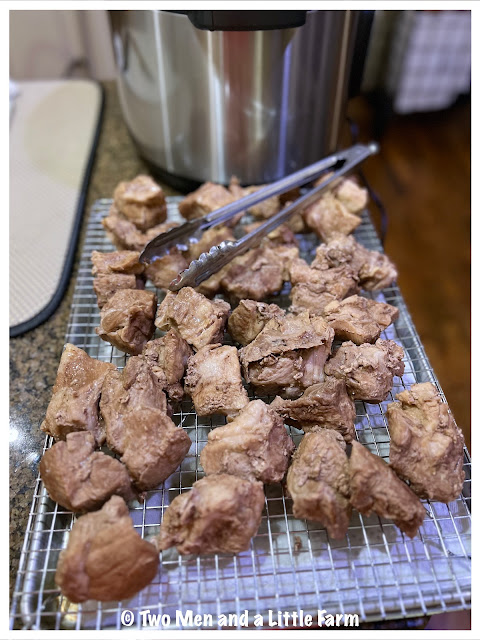
Carnitas precooked
This is what it all looks like after the 30 minutes of pressure cooking.  Falling apart tender.
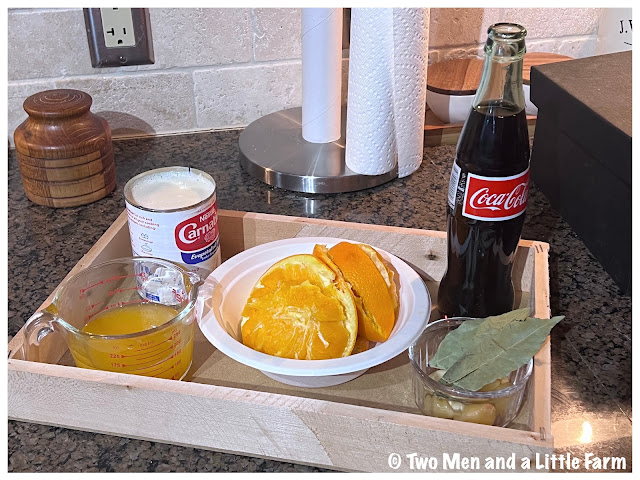
Prepping carnitas ingredients
While the pressure cooking is going on (if you choose that option), it's a good time to melt the lard in a large dutch oven or other heavy pot/cast iron.  Go ahead and open the coke, the can of evaporated milk, cut the oranges in half and squeeze out the juice of them until you get about 1/2 a cup of orange juice and have everything ready to go.
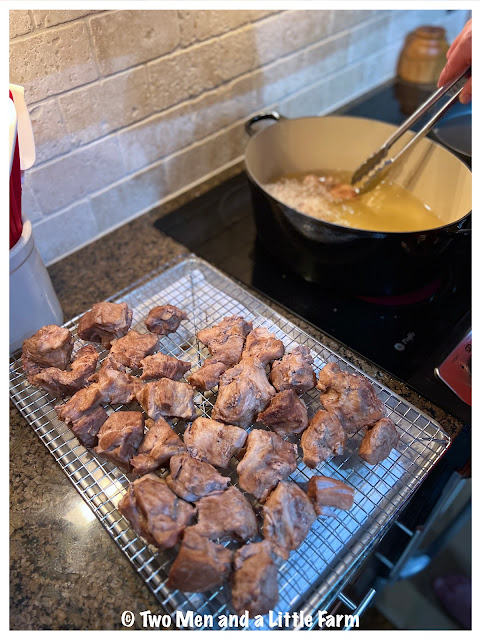
Frying carnitas
When it has reached 350 degrees, place the chunks of pork in.  Be careful, hot oil!
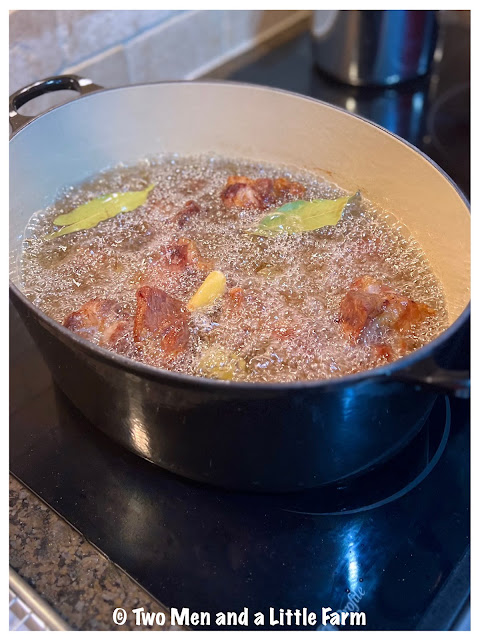
Carnitas
Next drop in the bay leaves and garlic cloves.
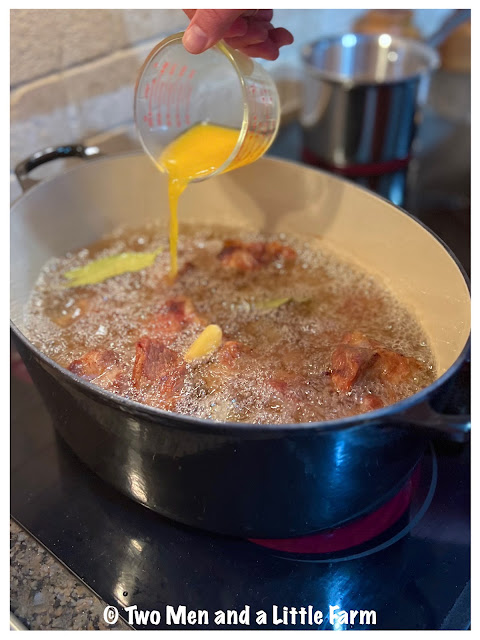
Orange juice in carnitas
Pour in the orange juice.

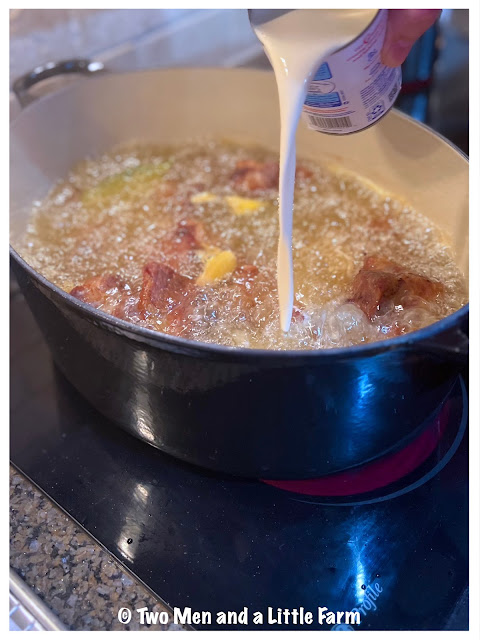
Evaporated milk in carnitas
Pour in the evaporated milk.

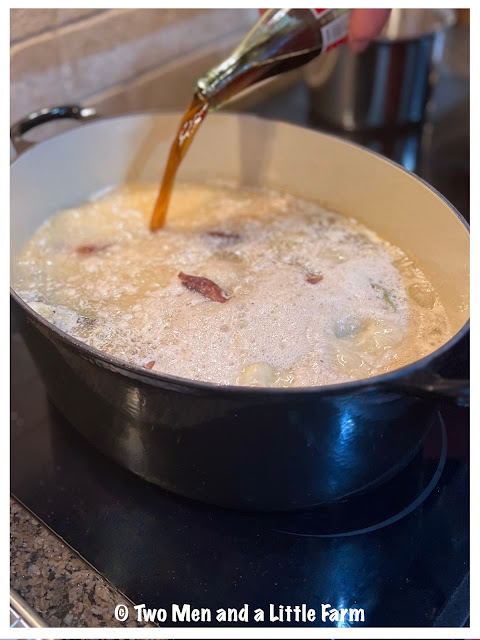
Coke cola in carnitas
Pour in the Coke.

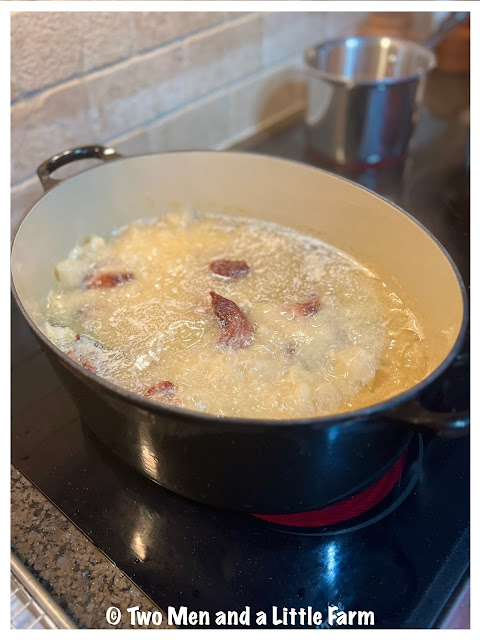
Carnitas boiling in lard
This is what it will look like.

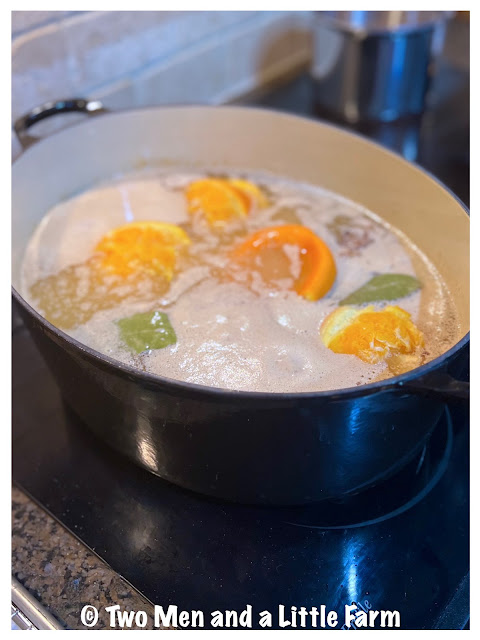
Frying carnitas
Finally add the chunks of orange (yep, more flavor).  Keep the temp around 250 (the added liquids will of course cool it down) but you don't want it back up at 350, now you want it to be somewhat low and slow and for about 30 minutes it will look like this, foaming and not clear.  Regularly move the pork around so it doesn't stick to the bottom (it will if you're not careful).
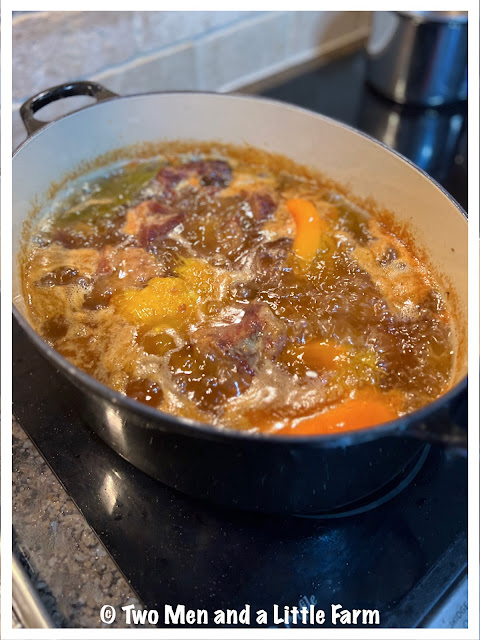
Frying carnitas
After about 30 minutes, it just clears up and looks like this!  Let it go for about 10 to 15 more minutes, still moving the pork around to make sure it's browning nicely.  The meat is cooked but you just want to get it to the point you like it, you want the exterior bits to be crispy and then super tender on the inside. 

Cooking carnitas
Fish out the oranges and bay leaves (the garlic has mostly dissolved), and then there will be little bits of pork that are floating around or in the bottom... by the way, these little bits are REALLY good, ha. 
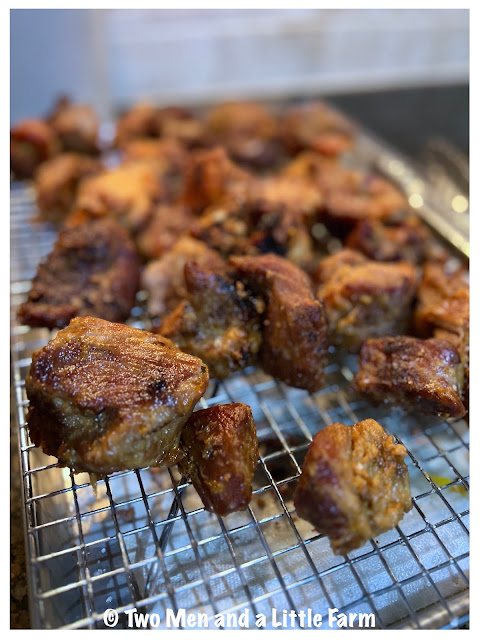
Mexican pork carnitas
This is what they look like.

Put them on a rack while you get everything else ready.  We sprinkle a little salt on them at this point.  They don't get greasy, you are essentially braising them in the lard, not frying them.
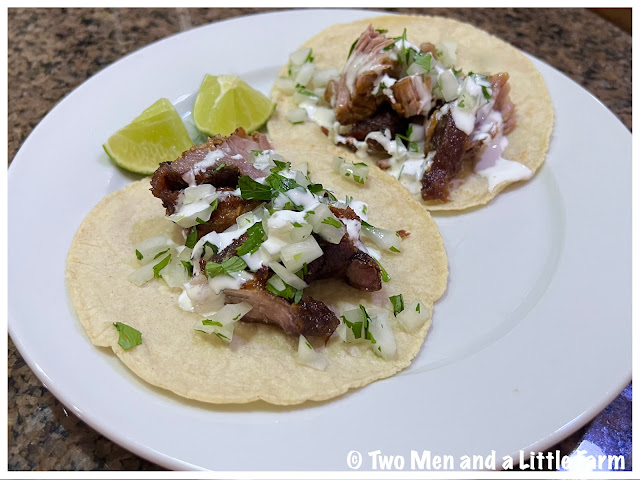
Carnitas tacos
They are served simply.  We chop up an onion, add cilantro, a squeeze of lime and some sour cream (we like Mexican Crema).  You can of course eat them on a plate just like you would chunks of meat with appropriate sides like rice and beans.
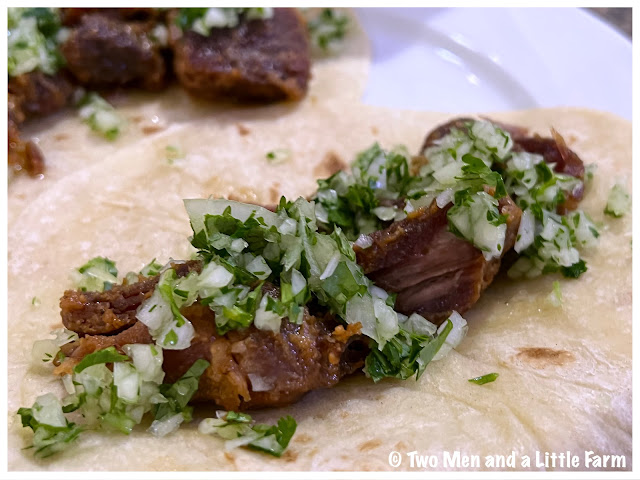
Carnitas tacos with flour tortillas
Carnitas tacos can be on flour tortillas (my favorite)...

Carnitas tacos with corn tortillas
Or corn tortillas (2nd Man's favorite)...

If you are not wanting to use lard, as we said there are other methods online, even oven cooked, whichever way you do them, try pork carnitas, they are SO good.