Friday, May 30, 2014

CAMOUFLAGE BUNNY

Shhh...be vewy vewy quiet...

Wild rabbit
Can you see it there in the picture above?
Sitting in plain view in the shadows?

I had to zoom in on the photo to show you the bunny.  

Texas bunny rabbit
While he's cute and fluffy and perhaps even cuddly, we're wondering how long before we're fighting to keep him (and family) away from the fruit and veggies?

But for now, we'll get along nicely.  He actually seemed to follow me around the last time I was out there.  With his unique half circle marking of spots, he was very easy to recognize.  

It's raining again today, in town, but not at the farm, so I might get some sunny time at the farm.  There are more chances tomorrow so not quite sure what will get done but we'll see!

DON'T FORGET TO ENTER THE GIVEAWAY!
IT ENDS TONIGHT!

Click HERE or on photo on sidebar.  Good luck!

FELINE FRIDAY

Catnip face
We always think this is so funny because this is his post catnip 'high' face. When he gets catnip on special occasions, he plays and rolls around and grooms himself and then when he's done, he's got this half eyed, loopy look for a few minutes.  Then he sleeps for two hours.  

What can we say, he loves his catnip!

It's Friday!  Yay!

Weekend is almost here, more later this afternoon! 


Thursday, May 29, 2014

MAYA ANGELOU, INSPIRATION THURSDAY


"Love recognizes no barriers.  It jumps hurdles, leaps fences, and penetrates walls to arrive at its destination full of hope..."

----------------------------

"Whatever you want to do, if you want to be great at it, you have to love it and be able to make sacrifices for it..."

----------------------------

"I'm just someone who likes cooking and for whom sharing food is a form of expression..."

----------------------------

"The truth is, no one of us can be free until until everybody is free..."

----------------------------

"There is no greater agony than bearing an untold story inside you..."


Wednesday, May 28, 2014

CLEANING UP AFTER CANNING JAM

One thing they never mention in books and articles is how messy canning can be.  All those tools and all that stickiness, it's definitely something to clean up.


I stared at the sink with the tools with stuck on jam wondering how much water I would waste scrubbing them and trying to get it all off...


...and then I saw the jam pan that was definitely covered in a thick, sticky mess.


Then I remembered the stockpot full of still hot water!  I just dropped all the items in there for a few minutes, swirled it around and voila, the jam melted off and they were ready for regular 'easy' washing.

After taking the tools out of the water and putting them in the sink for washing, I took the still really hot water and poured it into the jam pan.  A few spins of the spoon and we had a clean(er) pan to wash as normal.

It really made life much easier (and 2nd Man was none the wiser!). I would highly recommend, if you can jam or jelly or anything else messy, don't dump out your waterbath hot water until you've used it to help you pre-clean everything else.


And tip of the hat to Pooka and Mommy that suggested using the water to pour onto the garden or flower beds.  Totally waste free!  Great suggestion!


Tuesday, May 27, 2014

DEWBERRY JAM MY FIRST ADVENTURE IN CANNING

So, I decided that this weekend would be a good time to overcome my fear of canning.  Maybe fear is not really the right word.  It just all seems so daunting.  All those rules and tools and steps.  OK, yeah, I was afraid.

A few weeks ago, I won a contest over at Sandy's wonderful blog.  The book below is what I won. A few days before her contest appeared, 2nd Man and I were talking and he said "maybe there is a canning for dummies book you could get?".  I saw this on her contest, entered it and won it!  2nd Man told me it was a sign, LOL, and that I should just break down and do it.

Canning and Preserving for Dummies, available HERE via Amazon
The other day, I had some time off from work and so I gathered my tools and equipment and headed to the freezer.  I pulled out four 2-cup bags of dewberries vacuum sealed and frozen since 2012 and thawed them out in the fridge overnight.


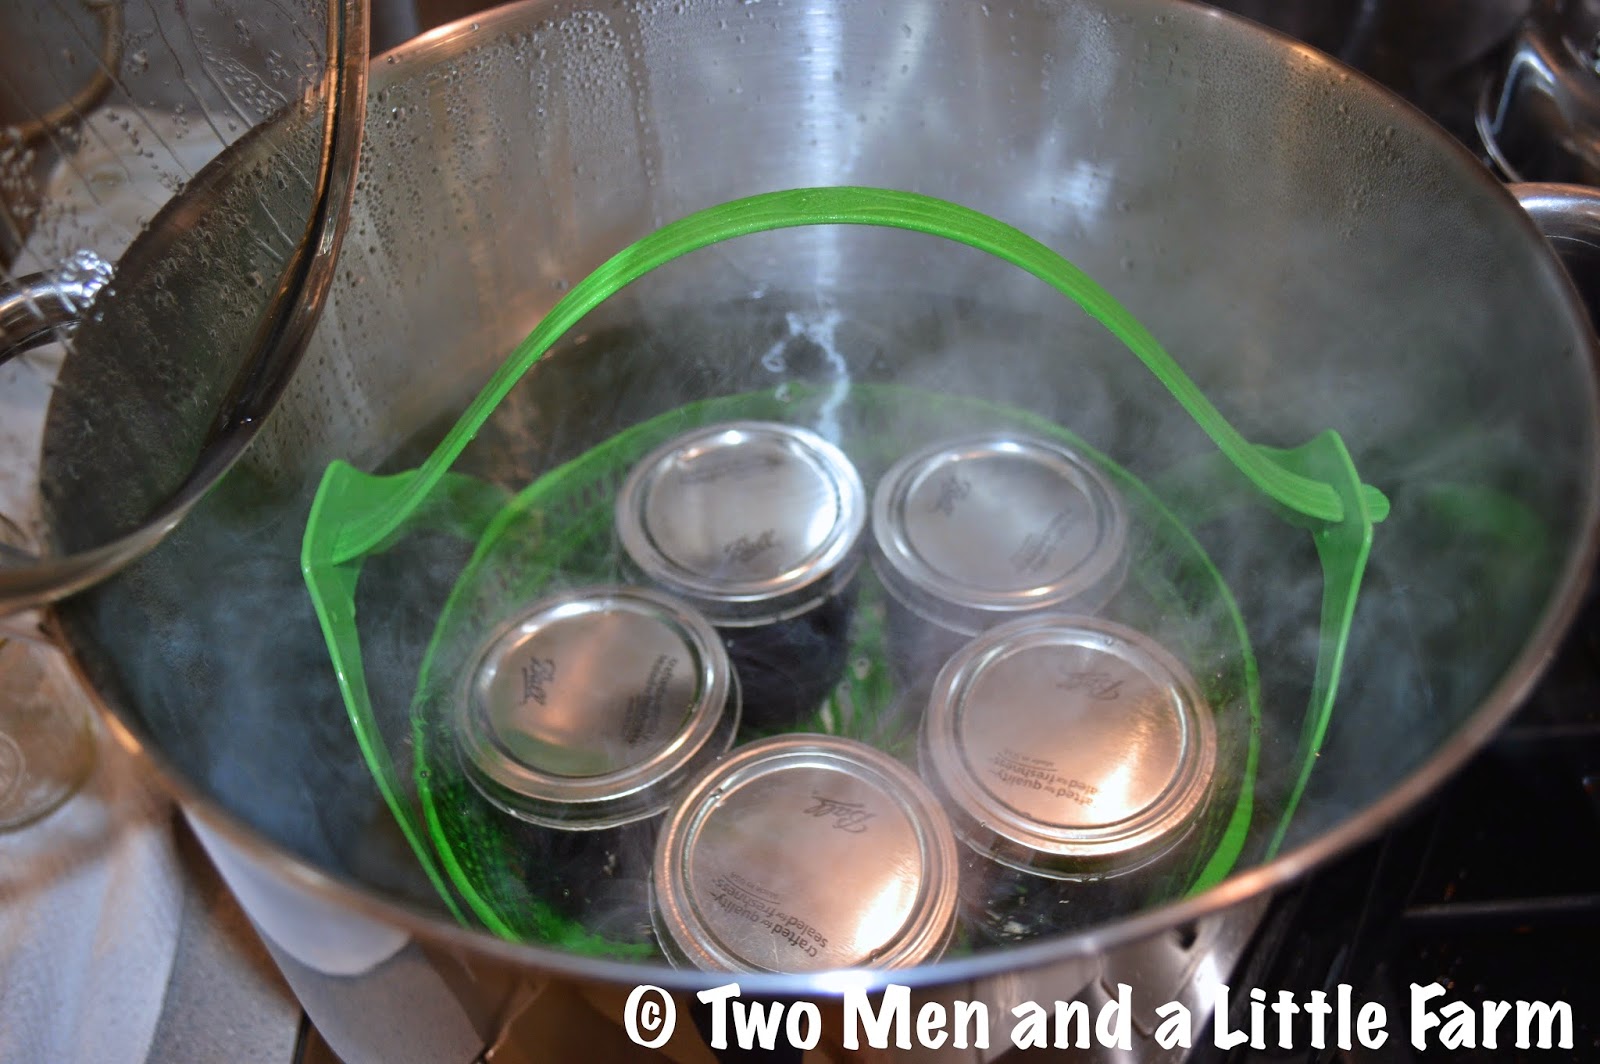
I bought a case of pint jars at the store and washed and prepped them.  Once clean, I put them in a large stockpot of boiling water.


Then I got out the first two bags and put them in a large, shallow pan.  I missed the photo, but I smashed them as they cooked with a potato smasher.  Bring them to a simmer.


Next I added a half a package of pectin.  I know not everyone uses it, but for newbies, it really makes it much easier.  I stirred that in and continued simmering for a few minutes.


Lastly, I added the sugar.  I  noticed that a lot of recipes used a lot of sugar.  We like jam sweet but not overly sweet.  So I used a 1:1 ratio for this jam.  4 cups of berries, 4 cups of sugar.  


I added that to the berries and stirred for a couple of minutes or until sugar was dissolved.  I immediately turned off the heat.  It thickens up fast, so work quickly.


While the berries were first heating up, I took the sterilized jars and lids from the water and let them dry.  I also sterilized all tools, including the funnel.  Then it was a matter of ladling the jam into the jars.  I got better after the first few.


I cleaned the edges with a clean cloth and put the lids on.  Lastly, I screwed the bands on until finger tight and placed them into the still boiling water.  I processed them for 10 minutes at a full boil.


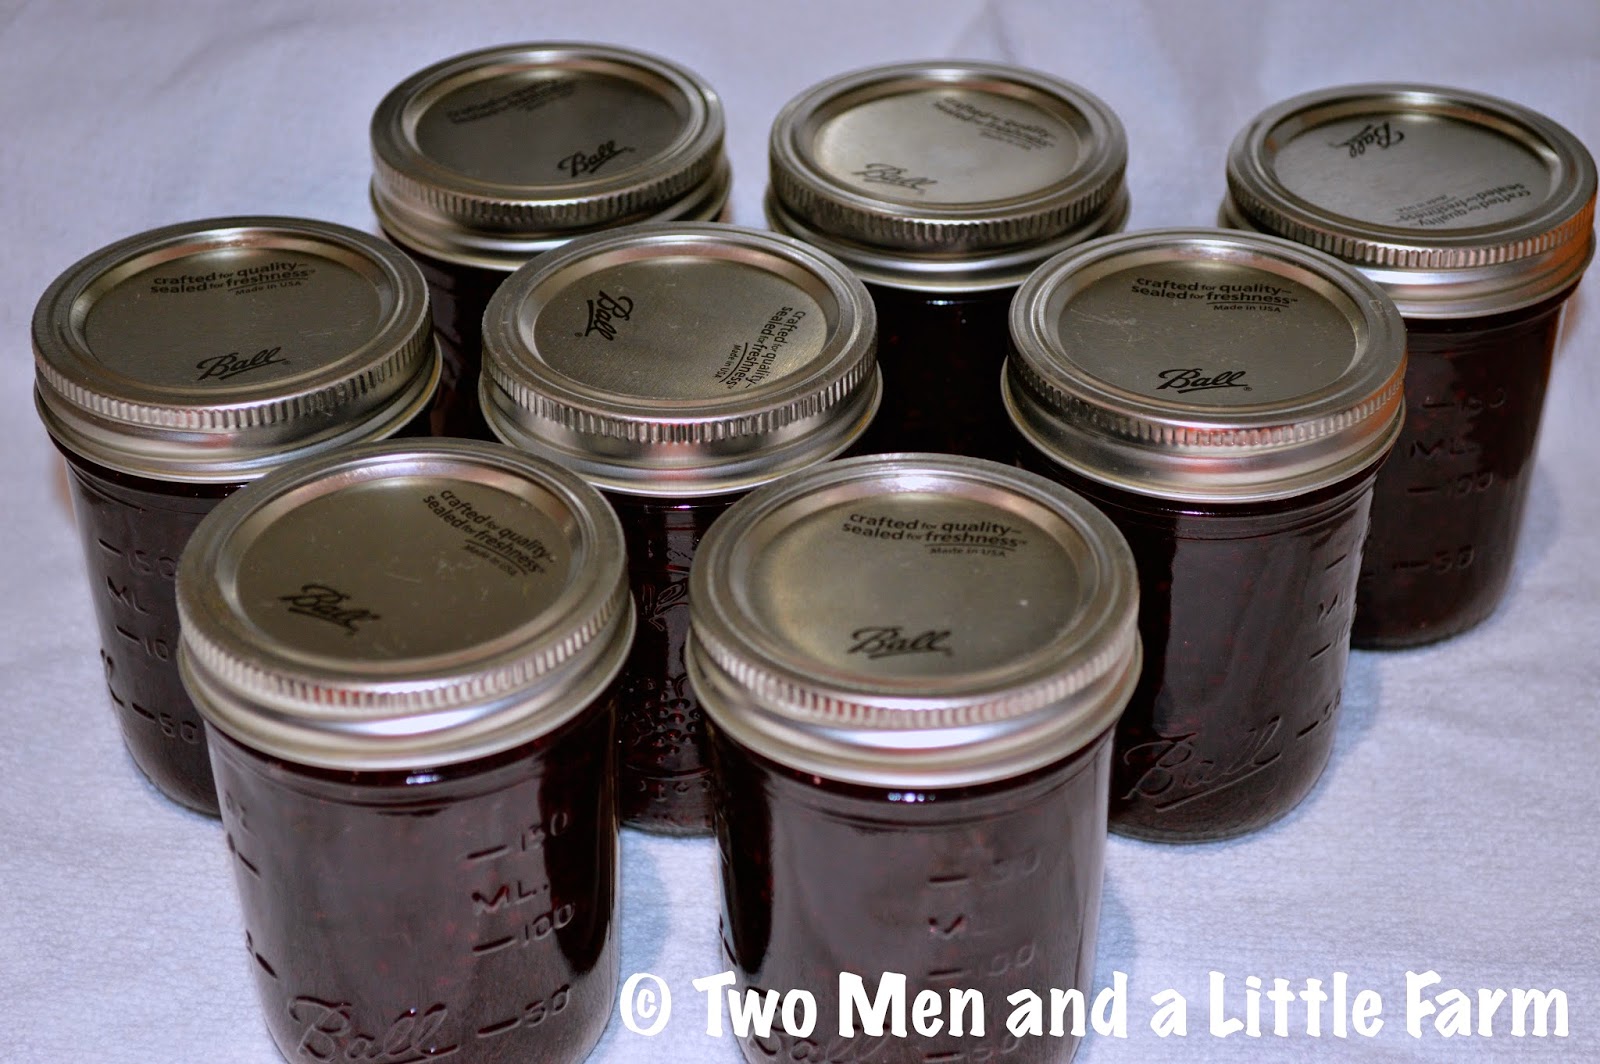
I did the above process twice, making two four cup batches.  It was much easier to make them in smaller batches.  Here is the end result!  Ten pint jars of dewberry jam!  All the lids popped and they all sealed.


After cooling overnight, we put one in the fridge for eating and we gave a jar to 2nd Family.  The rest are in the pantry...for now anyway.
Homemade Dewberry Jam
They look just as pretty as I imagined they would if my Grandmother had made them!  So my first venture into canning, appears to be a success.  2nd Man was so excited to see them when he got home from work.  I have to thank Sandy of course for the book, and Tonya for giving me encouragement way back when I first thought about doing it, not to mention the many others of you who commented with words of wisdom along the way.

In the end, it was not as hard as I imagined it to be in my head.  Don't get me wrong, it IS a lot of steps and you definitely need to be organized.  There is also a time element that you have to be prepared for.  Oh, and it can make quite the mess (more on that another time, ha).  I'm already thinking of my next project!

Happy Canning!

Monday, May 26, 2014

RAINY DAY WITH THUNDERSTORMS


Well, today was a washout at the farm.  We actually started to head out there and I noticed dark skies on the horizon.   We checked the radar and large storms were moving into the area.

Since many of the roads around the farm flood in heavy rains, and tomorrow is a work day, we figured it was best not to head out to the farm today and get stranded (though I couldn't think of a better place to BE stranded, ha).

The farm has already received over two inches (and counting) of rain today, according to 2nd Family.


This is the National Weather Service forecast for our area over the next few days.  We are near the white dot, just outside of the 7 1/2" rainfall total...in the 4" area!  This is a lot of rain coming.

UPDATE:  We have had tornado warnings and severe thunderstorm warnings, funnel clouds in the area, hail in spots, and some areas have already had from 5" to 6" of rain.  We are currently under a tornado watch and a flash flood watch.

Well, at least the dewberries and fruit trees and garden will have lots of water.

Hope your weekend was good and not a washout.


Sunday, May 25, 2014

SOME DEWBERRIES ARE READY


This year, contrary to our initial thought, hasn't been so good for dewberries.  The ones out in the open just sort of shriveled up.  We're guessing lack of our usual spring rains.  BUT...if you'll notice in this picture, the ones that are hidden up under other bushes...


...are plump and juicy.  Even with some ready, there are still more coming along behind them.  Hope to pick them Monday or this next  weekend.  We might not get a large amount but a few more bags for the freezer would be fine with us.


UPDATE:  Washout!  It poured/flooded so we didn't get the dewberries this weekend, hoping to get a nice haul this coming weekend.

MEMORIAL DAY, VINTAGE POSTER SUNDAY


For this vintage poster, since it is Memorial Day weekend, we wanted to find something that reflected that.  This early 20th century image is perfect.

This weekend, we are thinking of those that have died while in service for our country.  We also would like to thank those that continue to serve in the armed forces and their families that miss them every day.

It's off to the farm today for zen machine time.  That's always a good day.  It's a bit warm but kind of overcast so that should help.  There's even a chance of rain tomorrow and/or Tuesday.  We'll see if that happens.

Update later!

Saturday, May 24, 2014

A HAWK GLIDES BY

Hawk
The hawks are out in force this weekend, enjoying the windy day, gliding around, riding the air currents.  So pretty to see.  I love when they fly between the sun and us and there is a giant shadow that moves along the ground.

Such a majestic bird...

Closeup of hawk
Hope you are enjoying your weekend.  Here in the states, it's Memorial Day weekend and so for a lot of us it's a three day weekend.

More later and don't forget to enter the giveaway if you haven't yet.
Click on link over on the sidebar, or for mobile users,
CLICK HERE to enter.
  

Friday, May 23, 2014

SEEDS OF THE MONTH GIVEAWAY

In appreciation of our recent 2,000,000 page views milestone, we are having a giveaway.


And since it's TWO million, it won't be just one!  Instead of one, we will give away TWO of these!

It will be two six month subscriptions to Mike the Gardener's "seeds of the month" program.

For those who aren't familiar with it, Mike provides seeds each month:

100% Non-GMO
8 packages the first month
4 packages every month after that for six months.

The prizes will be two six month subscriptions for two  different entries.


Click HERE to visit their website


As always, and for those new to the blog, the rules are as follows:

You need to be a "friend of the farm" (a follower) and then leave a comment here on this thread letting us know that you want to be entered.

The contest will run until midnight at the the end of the month, May 31st, next Saturday night, at midnight.  The following day, we'll randomly pick TWO winners and then they will need to email me their shipping address at that time.

The contest is open to everyone, even those in other countries.

One entry per person.

Thanks and good luck!

CONTEST HAS NOW ENDED!
DRAWING SOON!


Thursday, May 22, 2014

HOME CANNING GALORE, INSPIRATION THURSDAY

Canning jars in pantry, image courtesy of Akannie of Dragon Woman's Kitchen
I recently saw this picture over at Akannie's blog and I told her that this inspired me and she graciously gave me permission to use it.  She is a canning machine for sure.   But images such as this remind me of my Grandmother and how she used to can so much every season, as my Grandfather gardened.

They kept their canned items in the cellar and I used to always ask to go down there and play.  I remember staring in awe at them, glistening like jewels in a bookcase.  A rainbow of colors.  I SO wished I had been more involved in helping her so I could have learned.  But hey, it's never too late to learn, and that's coming soon.  Until then, enjoy this picture (thanks again Akannie!) 

Be inspired!!


Wednesday, May 21, 2014

HOW TO GROW SWEET POTATOES IN A CONTAINER

So in the last post, we showed how we grew our sweet potato slips.  This is why we did it, we are hoping to have some sweet potatoes and here is how we planted them about three weeks ago.


The first thing I did was get a galvanized trashcan.  It was already destined to be used as a planter so I had drilled holes in the bottom and around the outside edge. A few of you noticed the cans in the garden pictures when we got the mulch done and wondered why we had them.


I filled up the lower part with one bag (1.5 cubic feet) of organic potting soil.  Total to fill the can was about four cubic feet.


After the first layer, I put a layer of composted soil and manure just to add some nutrients as the roots and potatoes grow downward into the can.


Then I topped it off with more garden soil.  The watering mechanism is a soaker hose that's normally used for trees.  It just happened to fit the top of the can perfectly.  It could be a tiny bit smaller but  we're still hoping that this works just as well.


Lastly, it was just a matter of putting in the sweet potato slips.  I put two in each trashcan container.  Hopefully even if one fails the other will make it.  If they both make it, maybe we'll have twice as many potatoes, ha.

Sweet potatoes growing in galvanized trashcans
OK, so it's not the most attractive set up in the world but hey, if we end up with sweet potatoes, that's all that matters.  We'll keep you updated on their progress over the next few months, they are a long season crop and we've already had them in their containers for a few weeks.


Fingers crossed!


Tuesday, May 20, 2014

HOW TO GROW SWEET POTATO SLIPS

Something we've been dying to try at the farm is growing sweet potatoes.  We love them!  We've tried growing regular potatoes in the past but it was difficult and they didn't do well in our climate.  Sweet potatoes however, love the heat so we thought we'd give it a try.  To order sweet potato slips (what the part is called that you plant in the ground), you must place your order early in the season.  We missed it.  What to do, what to do?  We decided to make our own!


First, get some organic sweet potatoes.  Make sure they are organic as regular sweets can be treated with a chemical that inhibits sprouting, which can prevent you from having sweet potato tubers later on down the road.


Cut them in half.  We were only needing a few so we figured two would give us enough slips from the four halves we would get.

We decided to try two methods.  The first was just placing them in a dish of water.  I decided to remove one potato half and root it separately with the toothpick method that most are familiar with.  I just put it in a glass of water, suspended by using toothpicks around the middle.


Then you just sit back and wait, making sure they never dry out.  Change the water every few days and keep it at the same level.  First, roots will start coming out the bottom of the cut side.  Then little buds will start popping out on the surface of the potatoes.  This is the result after about a month.  You can see in the background the one in the glass.  It grew just as well, in fact maybe even did a bit better.  Some of them grew better than others but they were the same two potatoes cut in half.  Go figure. 


Once they have grown a bit, you just break off the sprouts.  They usually just pop out with a bit of the sweet potato flesh on the end leaving a little divot in the potato.  After you've harvested what you want, throw the seed potato away.
How to make sweet potato slips
This is what they look like after you've pulled them from the potatoes.  Congratulations you have "slips"!  These of course are un-rooted slips.  You could put them in soil now as they are, just make sure they are watered regularly.  I think it's best to get some roots on them.  Just stick them in a glass of water and in another week, you'll have roots sprouting out!

Rooting sweet potato slips
Tomorrow...putting them in the soil!

Monday, May 19, 2014

TWO MILLION PAGE VIEWS


We don't even know what to say.

Two MILLION page views!

I remember when we made it to 1000, and then 10,000, and even the first 100,000.  If you had told us a few years ago we'd have a million page views, we wouldn't have believed it.  Now here we are with twice that!

2 million page views
We're goofballs, we were up this morning early on purpose, just to watch the counter roll over.  It was April 13th of last year that we made it to 1,000,000.  So we are now at just about a million page views per year.

In honor of this milestone, we'll have a special giveaway soon, something fun for all you gardeners out there.  Please check back in a few days while we get the details worked out...

And again, from both of us, we give you all a million two million thanks and two million hugs!


PARK STYLE GRILLS FOR THE FARM

So here is the purchase we made last weekend for the farm.  We have always wanted one of these grills.  They are the kind that are used at National Parks and Campgrounds across the United States.  In fact, when we've shown friends and coworkers, they say "we used those when we went camping!"  We really like cooking over wood and/or the hardwood natural briquettes, and these are the kind that should hold up for years and years.

We had to do some research as there are plenty out there that "look" like the originals but there is only one original.  The others are made with a thinner metal and probably don't have the longevity as the ones made for parks.  These are made by Pilot Rock, who has the contract to provide them for parks around the country.  We ended up buying them from Northern Tool because they have free shipping when it's "site to store".  When an item weighs a lot, it can save money in shipping fees if you live near one of the stores.

They do sell them through Amazon, click HERE to see the variety.  Just remember that the Amazon link does offer them from several resellers.

We didn't get just one... 


We got two!

Heavy Duty Park Style Grill
We think this is where we are going to put them.  Since they have to be put into the ground with post holes and then set in concrete, we should probably make sure where they are going to go before we make them permanent.

Locating grills at the farm
This is the area off the front porch (this photo was actually taken from the stairs of the porch).  It's fairly close to the house so we don't have to walk two acres with food and it's just around the tree from the future outdoor dining area that will be under Barnabas the old mesquite tree.  We think it's the best spot for them, give or take a few feet.

Eventually, once I get some holes dug, we'll get them in place and start doing some grilling!  Hopefully later this Summer.