Thursday, February 13, 2014

GARDEN SCARECROW, INSPIRATION THURSDAY

Scarecrow in garden, image courtesy of Southernliving.com
OK.  Silly inspiration but hey, if you've always wanted one, then that makes it valid, right?  So for  the longest time I used to have a fascination with scarecrows.  Loved seeing them as a kid.  Some kids are scared of them but I guess the ones I saw were never scary.  Anyway, as I grew to adulthood, I never gave it much though.  And to be honest, even once we bought the property, and I was dreaming of gardens, I didn't think about it still.

Then one day I saw this picture on a gardening website and I told 2nd Man, that's it!  We need a scarecrow at the farm!  I'm not sure if they really work, but they look great and I've got a big spot in the future garden that one would look perfect in.  Now I just need to figure out the easiest way to make one.  Looks pretty simple to me.  A cross of some sort and some old clothes.

What about you?  Ever had a scarecrow?

Have a great day!

Be inspired!

Wednesday, February 12, 2014

SIGNED UP FOR BEEKEEPING SCHOOL

A couple of years ago, I took a very basic 'intro to beekeeping' class.  I had a blast getting up close and personal with bees and it gave me, no pun intended, the bug for keeping bees.  Of course at that time, we had to do much more on the property to even get to that point and to be honest, I also wanted to see if I felt comfortable around them.  Here are a couple of photos from that class:

Me, holding bees!
I was definitely comfortable, ha.
I was also totally fascinated by the whole process, not to mention the natural beauty of the bees and how they create what they do.

Honeycomb section with honey
So recently, a fan of the blog who lives not too farm from our farm, reached out in an email to say hello and chat.  Turns out he and his wife built their dream home on some rural property and like us, have planted fruit trees, berries, etc, on their land.  They also have a couple of hives!

Also like us, they had no experience prior to having them but had always wanted to do it.  So last year, they took a beekeeping course and then jumped in and did it.  And they enjoy it.  In our email conversations, he gave me the information on the school for this year.  It's an all day event, with a beginners class in the morning with a lot of information and then you can choose from a wide variety of informative classes in the afternoon (up to four per person).

So last night, I signed 2nd Man and I up for the school!
Anyone in this part of Texas that might like to attend, here is the link:


We are looking forward to it and of course, a big thank you to JM and his wife for not only the kind words about the blog, but for the wonderful tip about the school.  Let this be the year of "beginning the bees" at Seda Bolsa Farm!


More as it gets closer to the class.
Saturday, March 29th 2014 in Brenham, Texas.

Tuesday, February 11, 2014

HAVE YOU EVER BEEN HANGRY


Saw this sign on a poster at lunch today and just had to share.  Too funny!
How many of you have been "hangry" but didn't know what to call it?

I think I just found a new word to add to my vocabulary!

Can't wait to tell 2nd Man, "I'm hangry...you wouldn't like me when I'm hangry."

LOL!  On second thought, maybe not such a good idea after all. 


NADEAU HOUSTON STORE HAS MOVED

For those in other parts of the country/world, this post won't mean much but since we do get a lot of traffic on the blog from here in Houston (though they have stores around the country), and this is our favorite furniture store, I wanted to make those of you here locally aware of Nadeau Houston's relocation.

nadeau, furniture with a soul, click above graphic for link to their main website
For several years, they have been in the Village, off of University Blvd, but as of a couple of weeks ago, they have moved.  The Village location is closed and relocated to Durham Dr, just South of I-10, in a huge warehouse type space.

They are now located at: 1502 Durham Dr. Houston, TX 77007
Phone: (713) 942-9310

I can't tell you how much we enjoy this store.  In a sense, much of what we've done inside at the farm was built around the furniture we've selected from their inventory.  And just last Summer, some pictures of the inside of the farmhouse were featured on their website/blog.  Wouldn't it figure that they've relocated CLOSER to where we live in town, and that could be dangerous!

Check out the Houston store inventory by CLICKING HERE.

If you pop in to see them, ask for the manager, David, he is awesome!


Monday, February 10, 2014

WATER PREPPING AFTER WEST VIRGINIA

West Virginia state flag
I'm sure many of you saw the news out of West Virginia a few weeks ago.  The mess is HERE for those who haven't read about it.  Long story short, a chemical storage company had a failure of a toxic chemical storage tank which then leaked some horrendous chemical into the water supply of a large part of WV.  Residents all around the area were told to stop using water.  Not just 'don't drink it', but don't bathe in it, don't wash their hands with it, don't wash dishes, don't brush their teeth, don't even flush toilets.

Basically they were told not to touch it.

Water!?
Dangerous!?
Hazardous to your health!?


It's something we all take for granted at times.  We turn on the faucet and water comes out, right?  But what happens when it doesn't?  Or if it makes you sick even if it did come out?  It got us to thinking about being prepared.

Now at the farm we are on a well, and it's fairly deep, so the water is relatively safe from above ground contamination.  Still, who knows what might happen, even down underground?  Though unlikely, it could become contaminated.  But certainly the water system in town is VERY susceptible to something like this.  Heck, during Hurricane Ike, parts of the city had to boil water for a few days.

So what if that did happen in town...no water?
This is what would happen...

Water shortage, photo courtesy of WOWK
This is an actual Kroger store in a city in WV.  With more than 300,000 residents having no water, stores were inundated by people within a few hours.  In fact, in less than a day, authorities said there was no water to be had anywhere within a one hundred mile radius!


The farm is not only our future retirement place, it is also our "bug out location", our safe place to go if we can't stay in town for any reason.  No running water or not having drinking water would definitely be a good reason.  


So at the farm, we are keeping fresh water stored.  We have our water cooler which of course, holds 5 gallons at any one time.  Then we keep two back up, already filled, 5 gallon bottles in the mudroom.  This means we have 15 gallons of clean fresh water at any given moment.  That's not enough though to live on for any length of time.  The general rule of thumb for water storage is 1/2 - 1 gallon per person, per day.  If we were frugal, the two of us would have drinking water for 15 days.  If it was Summer and hot (which goes without saying here in this part of Texas), we might only have half that much time.  Add to that the fact that you would also need water for the other things that stopped in WV like washing, bathing, cleaning, and flushing.  Reading all of the stories in West Virginia reminded us that we need to up our own capacity:
  • We will add two more 5 gallon bottles of water for a total of 25 gallons.
  • We are getting gutters on the house this year and will finally begin the process of harvesting and storing rain water.
  • We'll need a purification means to treat that rainwater (or the well water).
  • We're looking into the waterBOB emergency storage system as a means to have a bit more water stored, of course when we have notice of a major event such as a Hurricane.
  • And lastly, we're going to talk to 2nd Family (whom we share the well with) about alternative means of pumping water, manually and/or with solar.

Water = life,  so make sure you have it and have thought about what other options you might have without it.  How is your storage going?
Any ideas or suggestions?

Sunday, February 9, 2014

VINTAGE POSTER SUNDAY, DELICIOUS RABBIT DISHES

Delicious Dishes Rabbit, vintage poster image courtesy of Imperial War Museum
A few weeks ago, I posted an image of a WWII poster that showed what to feed rabbits.  I guess there was a theme going on at the time, raise your own rabbits to help with feeding people at home (which in turn helped the war effort).  This poster gave all sorts of "delicious" options.  Rabbit Pie, Fricassee of Rabbit, Curried Rabbit, Roasted Rabbit, Rabbit Stew, and two we've never heard of Jugged Rabbit and Rabbit Brawn.

Phew, I feel like Bubba from Forrest Gump!

I can honestly say we've never eaten rabbit.  I'd be wiling to try it but I'm pretty sure 2nd Man wouldn't even try it, ha.

This weekend has been unproductive (related to the garden).  There was some stuff done but for the most part, I wasn't able to do outside what I wanted to do in the garden.  So next weekend, weather permitting, I'll have to bust my behind to get back ahead of the game.

Hope your weekend is going better!

Saturday, February 8, 2014

OH OH, MILDEW ON SIDING

Mildew on siding
Anyone have a solution for this?

I haven't walked around to this side of the house the last few weekends, it's the North facing side, and without having to mow, I don't have much reason to go back there right now, ha.  Focusing on the garden now.  Anyway, went back there and we noticed that there is some green growth on the siding.  I'm guessing it's mildew of some sort?  As for the "clean strip" on the siding?  It's under one of the window units so I guess it's shade just right?  Weird.

Mostly likely it's the cool, damp weather the last few weeks has caused it, coupled with it being on the North side and not getting much direct sunshine.  Anyone have a suggestion to clean it?  We were originally just thinking of a bleach/water solution but didn't know if there was some other option?

It's always something, huh?

Friday, February 7, 2014

COUNTRY FARM ANIMAL PANCAKE PAN

Nordic Ware farm pancake pan
I found this on clearance at lunch and just had to get it.  It's used to make the small silver dollar size pancakes (slight larger than that actually).  And of course, when you pour the batter in and make them, they come out with a farm animal imprint on each one.

I found it at Marshall's Home Goods, but I did some Googling and they still sell them HERE AT AMAZON if you should be so inclined.

Can't wait to use it.  Should be cute and fun.  I wish I could say we'll use it this weekend but alas, 2nd Man is getting ready to head off to Arizona to start working there again.  He's been working in town the last two weeks but travel starts up again this weekend.  So, I'm on my own at the farm.  I'll work on the irrigation set up, if the weather cooperates of course.  We actually had sleet and ice again yesterday and this morning.

 O Spring, O Spring, wherefore art thou?

Hope you have a great weekend!


ZOMBIE GARDENING

In Case of Zombies...or Yard Work   original source unknown
This weekend is the return of AMC's The Walking Dead tv series.  We're fans.  And so when I saw this, not only did it make me laugh, I would SO love to do this on a storage wall of tools at the farm
(John in Trelawnyd, you reading this?).

I could totally see this on the side of the barn.
It would be hilarious!


Thursday, February 6, 2014

FLOWERS AND A SHED, INSPIRATION THURSDAY

Image courtesy of BHG.com
We just like the layout and colors of everything in this picture.  The yellow flowers are stunning, the dark red ones in the background are pretty, the green grass and even the rustic shed.  It could also just be the middle of Winter blahs and longing for color.  Heck, even green would be welcome at this point!

Hope you are having a good week.  It's almost the weekend!

Be inspired!

Wednesday, February 5, 2014

ONE PAN PASTA RECIPE


We can't take credit for this recipe, though we did tweak it a bit for our purposes.  It's ONE PAN PASTA courtesy of Martha Stewart Living.


First you put the ingredients in a pan.  Make sure you have a pan that will fit the pasta.  Yes, you put the pasta in dry along with the tomatoes and onions and sliced garlic.


Then you add the water, and some fresh basil leaves, oil, salt and pepper to the pan.  Oh, and some pepper flakes for a bit of heat
(optional of course).


Bring to a boil over high heat and then just start stirring.  It might look like too much water at first but don't worry, it will cook down in time.


Just keep it boiling while stirring, gently moving the pasta around in the water.  We found that a pair of tongs worked wonders for this.  As you stir, the water will start to evaporate...


...and in about 10 minutes, what's left will thicken and become a sauce.  The onions  and garlic have cooked down and even the basil and tomatoes start to break down.


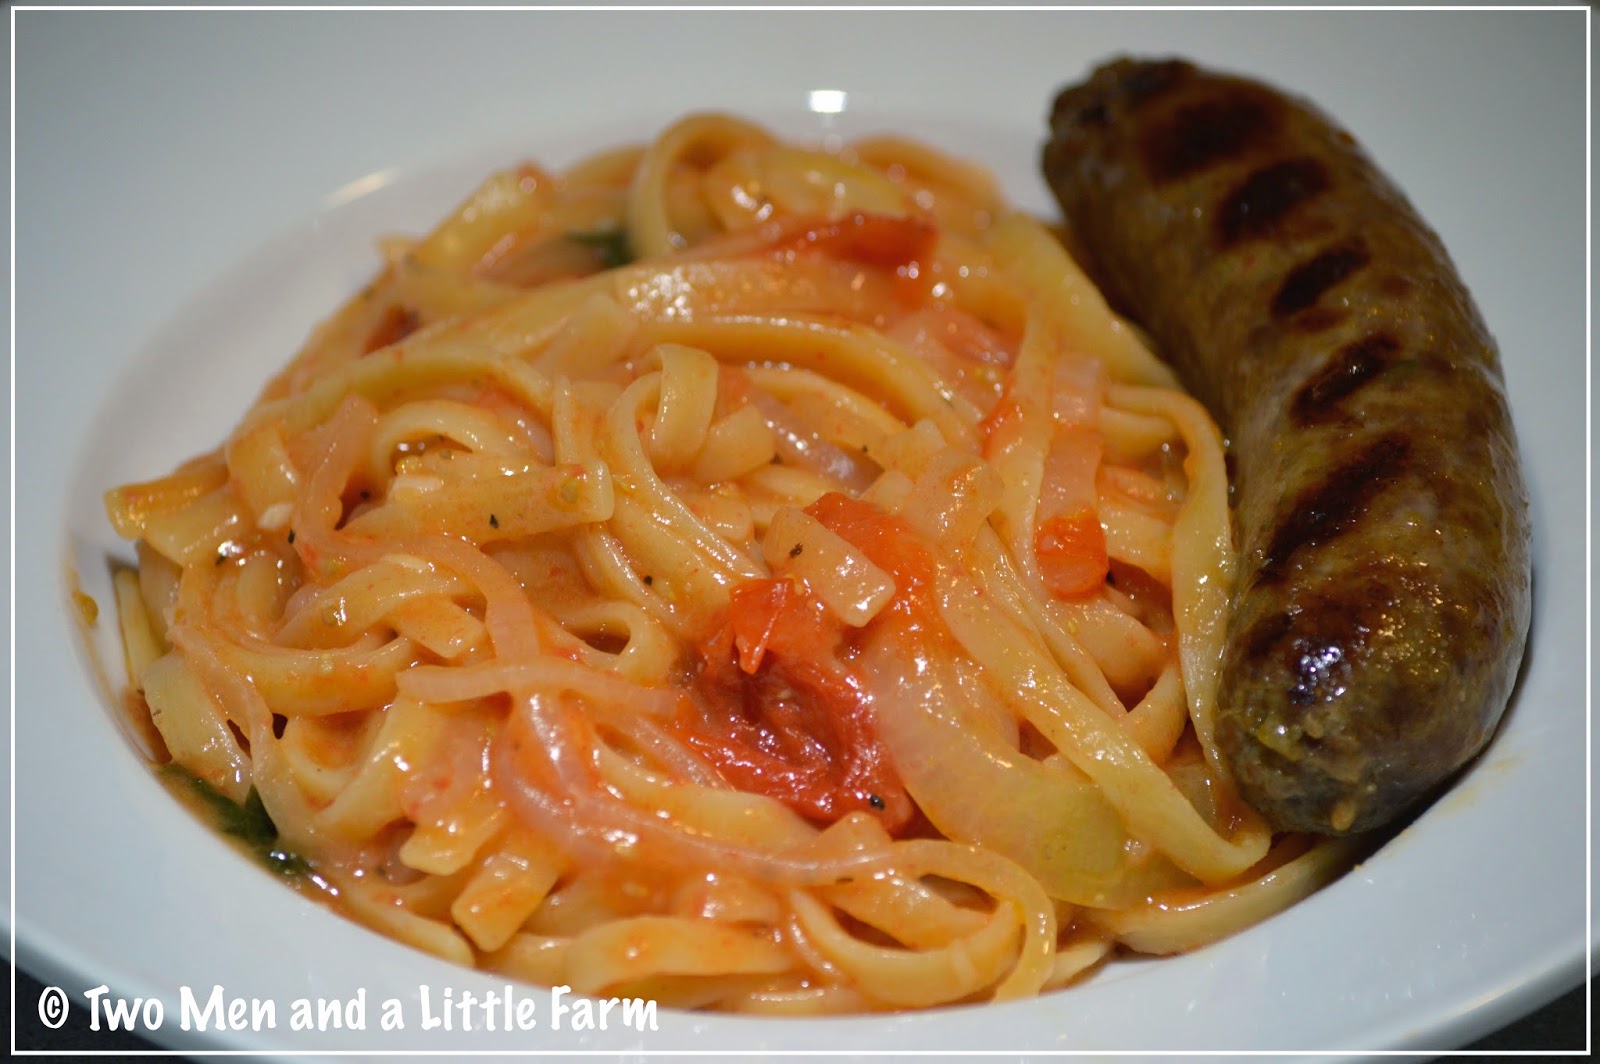
To add a bit of meat to the dish, we pan grilled some lovely Italian sausages to serve on the side of the pasta.  Not required but definitely good.
One Pan Pasta
And that's all there is to it.  The tomatoes have mostly broken down into a creamy, pink sauce and the onions and garlic are there, only now they are just softened and sweet.  The sausage on the side adds a wonderful 'extra' but of course, it's not necessary (we just like it).

INGREDIENTS:

16 ounces of linguine pasta, dried
12-14 ounces of cherry tomatoes, cut in half (we used mini San Marzano's)
1 onion, thinly sliced
4 cloves of garlic, thinly sliced
2 sprigs fresh basil
1/4 tsp red pepper flakes (to taste, optional)
2 TBSP of Extra Virgin Olive Oil
Salt and Pepper to taste
4 1/2 cups water

Thank you Martha.
A lovely new recipe to add to our routine.

Tuesday, February 4, 2014

GARDEN FENCE ANIMAL PROOFING QUESTION

Something I thought of that I need to do, some protection from animals that might want to come through the fence pickets (ones that would fit of course).

Garden area fencing
So do you all have some good ideas for screening this?  Our thought was to put some screening of some sort, like chicken wire, along the the bottom 1/3 or so of the fence.  At first, I was thinking of just stapling them onto the outside of the fence and onto the pickets.  BUT, we're not sure we want it on the outside of the fence, just in case we want to paint or stain the pickets later.  Plus it would just 'look' better if it was on the inside of the fence instead of the outside.

Then I realized, looking back at pictures of the fencing, that the inside will be a bit more difficult to attach to.  I suppose I could just take a narrow strip and dig it into the ground a bit and then staple to the bottom rail and the onto each post and just leave it as high as the bottom rail (bottom red line)?  Or should I just go higher and staple it to each post and go up 2 feet or so (top red line)? 

Any other suggestions on what to use?  Something other than chicken wire?  This might be part of the weekend work, depending on weather (as usual).


Monday, February 3, 2014

RAISED BED CONSTRUCTION FINISHED

I won't bore you with more photos of the construction process.  It was easy, the same as BEFORE.  I used the raised bed corner brackets, screwed them together with Deckmate screws (rustproof), and rolled them, like square wheels, into position.  They are all three feet apart from each other, to make it easier to get wheelbarrows carts and other things in between them.

4x4 Raised Beds
This is a side to side view.  I did the four on the right last weekend and the last four (on the left) this weekend, before the rain hit.  I'm not kidding when I say we literally just got the last one into place when it started sprinkling. We loaded up the car to keep the tools out of the rain and then went to the porch when it started pouring.  Work outside done for the day!

Next step comes irrigation.  I'm currently figuring out the best way to do it since the water faucet is so far away. Most likely, an underground pipe or hose from the house to the garden area.  Once I get it there, I've got a drip irrigation system ready for that end that will, hopefully, work.  

Of course, the weather changed yesterday, rained all day again and got cold...down into the 30's during the day.  I'm not sure what this weekend's weather will be like.  If we wait long enough, it will change.  One good thing for sure, the rain will loosen the ground for digging a trench, which will help ease the hardest part of the work.


Sunday, February 2, 2014

STUPID GROUNDHOG

Image courtesy of http://vintagemarigold.blogspot.com
He saw his shadow...
SIX MORE WEEKS OF WINTER!?

Image courtesy of earthsky.org
And today it's cold and wet.

Sigh.

Off to watch "the big game" (i.e. The Superbowl)

EDIT: For those in other parts of the world who are unfamiliar with our sometimes 'odd' holidays, HERE is the Wiki info on Groundhog Day.  According to traditional lore, if the groundhog sees his shadow on February 2nd, there will be six more weeks of Winter.  If he doesn't, it's an early Spring.
Click HERE for a bit more info from the official website.

PUT YOUR MUSCLE ON, VINTAGE POSTER SUNDAY


Not sure how many young people today would sign up for something like this, but it's nice to think that there was a time when they would.  This poster from WWII urged young men to sign up for a farm job and use their muscles to help support the war effort.  

The phrasing is different to me though...'put your muscle on a war basis'?  I understand the point but the use of 'on a war basis' sounds odd.  Any thoughts?

Cold and rainy today.  Is Spring coming soon?  We hope so!


Saturday, February 1, 2014

AND THE RAIN IS BACK


Well, this is the weather here today.  I was able to get several things done outside at the farm so that's good, but now it's pouring rain and the cold weather is coming tomorrow and will last into the week. 


This seems to be the Winter of "if you don't like the weather, just give it a minute, it will change".  More on Sunday.  Hope your weekend is staying dry.


Friday, January 31, 2014

FARM SKY AND WEEKEND PLANS

A view from the porch
Took this picture at the farm last weekend and just loved playing around with the camera settings to create something pretty.  Enjoy!

Off to the farm Saturday...by way of the lumber yard to get the last of the wood for the last of the raised beds.  There is rain in our forecast for "Superbowl Sunday", so I may only have Saturday as the window of opportunity for any outdoor work.  Then cold again next week.  Sigh.

Anyone else have big plans?  Whatever you end up doing, we hope you have a wonderful weekend...updates as things warrant.


FUNNY FELINE FRIDAY

Brisbane...LASER CAT!  
I've always loved glowing cat eyes, it's so mysterious and fun.  And, I wistfully imagine that they harbor all sorts of crazy powers.

In this case, Brisbane becomes LASER CAT!

More this afternoon/evening.


Thursday, January 30, 2014

SUNFLOWER HOUSE, INSPIRATION THURSDAY

A sunflower house, image from Pinterest
We've always wanted to do this.  This is part of a trend of growing sunflowers and turning them into 'sunflower houses'.  I think it's such a neat idea.  Sunflowers are such a 'fun' flower and growing them deliberately in a pattern like this so as to make a small 'room' of sorts is a great idea.  

Sure it's for kids, but hey, can't adults enjoy it as well?  I could envision a table and chairs in the center?  Or a rocking chair?  Or maybe, just like in this one, a blanket on the ground?  I've never tried growing sunflowers but if they would get this big, it would be an awesome sight to see, ha. 

Be inspired!


Wednesday, January 29, 2014

OVEN ROASTED PORK SHOULDER


Who doesn't love a good roasted pork shoulder?  We do ours very simply and it comes out wonderfully every time.  First, we put a couple of sliced up onions and a few garlic cloves in the bottom of a large covered pot along with about 1/2 cup water.  Score the fat cap on top.


Then, just simply put it in the oven, covered of course, and cook it at 350 degrees for about 3 hours.


This is what it looks like after you take it out of the oven and open it (and the house smells wonderful).


Just use some tongs to pull out the bone  It should wiggle and slip out easily, but if it doesn't, put it back in for another 30 minutes.  Peel off the fat cap and pull off any other pieces of fat that you don't want.


Then just start pulling it apart, first in chunks and then into shreds.  You can use the tongs or a couple of forks to make it easier.  You shouldn't have to drain anything, it all just adds moistness to the meat.


And believe it or not, the pan cleans up well.  All that dark stuff just comes right off when you shred the pork and stir/push it around.

The onions and garlic have, at this point dissolved into everything and you are just left with wonderful shredded/pulled pork ready to use.  We like it just like this with some coleslaw on the side.  We sometimes add barbecue sauce to it for wonderful sandwiches.  We've put the pork into flour tortillas with cheese and salsa for a Mexican twist and we've even used it for a shepherds pie.

Yummy!